Saturday, April 6, 2013

Fabric + Inspiration = Fabulous Dress


I saw this dress on Pinterest a couple of weeks ago...LOVE IT!  It's part of the Louis Vuitton, Fall 2013 collection.  The mix of the plaid and the lace is what I love the most about it.  So this morning I'm looking through my Style board where I have this picture pinned and it hits me!!!  This fabric is just like one of the fabrics I scored at Walmart last week, at a whopping' $1.00 per yard!


Thinking of using Vogue 8069 View A and making a jacket to go with it. This is an OOP pattern I had in my stash.


Friday, April 5, 2013

Cheers to the freakin' weekend!!!!

Yeah, its Friday!!! You know what that means....MORE TIME FOR SEWING!  I'm so glad I moved my sewing room, it has made a HUGE difference...I have my mojo back!  I have been coming home every day and heading straight to the sewing room.  Good thing it's just me at home, because no one would be eating or getting any kind of attention.  My focus has been totally on sewing!  And I am loving every minute of it. 

I'm getting re-aquinted with my sewing machine and dusting out the cobwebs on my sewing skills.  I even got inspired enought to take my degree off the bookshelf, frame it and proudly hang it on the wall.  Goodness...just think of where my skills would be if I had really really done more sewing when I got out of school.  But anyway...its never too late.  Everything happens for a reason, in it's own due time.

This weekend I am going to concentrate on finishing up the projects I have cut out and partially sewn up.  So hopefully before the weekend it out I will have some pictures up.

Happy Sewing!!!

Thursday, April 4, 2013

Fabric Haul


...from Walmart of all places.  I went over to the fabric section looking for ribbon for another project (no luck) and decided to check out the fabrics they had.  I plan on making simple pencil skirts to add to my 2013 Wardrobe Challenge.  So I got 9 yards of frabric for a total of $16!!! WINNING!!!

These two fabrics are winter so I won't be able to wear them just yet.

You can't tell from the picture, but the one on the left is a lemony yellow.  Very sunny and happy!  I will be sewing up a couple of things for spring with this one.  I got 5 yds of it.
Once I got the blue dotted stripe fabric home I decided I wanted to make some pants out of it as well, so since I only purchased 2 yds of it, I went back today and got 3 more yards.


Wednesday, April 3, 2013

Gotta have a plan...

So I have been thinking about the "Sew Your Own Wardrobe" challenge trying to figure out how I am going to tackle this.  At first, I was thinking....just sew outfits.  But I could not quite rap my mind around that one. 

Then I started to think back (realy think way back) on how we had to do our projects in school.  So I decided to do "colllections" or mini-wardrobes. That way I can maximize on my wardrobe potential and have pieces that can coordniate with each other within the collection as well as inter-mix with other collections.  This concept is also called "Sewing With A Plan" (SWAP).

So here's my SWAP...I'm thinking the base for each mini- wardrobe collection will consist of 5-6 peices:

A)

3 - tops
2 - bottoms (any mix of skirt, pants or shorts)

B)

2 - tops
1 - bottom (skirt, pants or shorts)
1 - dress

And then add in a light weight jacket or cardigan for the spring/summer or a coat for the fall/winter.  Plus what ever other outfit, dress, shirt, pants or what every I get inspired to sew through out the year.


Tuesday, April 2, 2013

2013 Wardrobe Challenge

Join the Challenge-Sew Your Own Wardrobe for A Year

Melanie posted about the Sew Your Own Wardrobe Challenge that is hosted by Pattern Therapy and The Fearless Seamstress and I knew...this is the challenge for me!I need to build my wardrobe and work on sharpening my sewing skills. The challenge begins on April 1, 2013 and runs until March 30, 2014. Participants commit to twelve months (one full year) of sewing their own wardrobes and not purchasing ready to wear clothing. I'm going to try my best to stick to this plan, which in actuallity should not be to too hard, because I hate clothes shopping.

I am so excited about doing this.  With all the pattern sales that JoAnn's, Hancock Fabrics and Hobby Lobby has had in the last few weeks, I have plenty of outfits to choose from.  I am going to start however with trying to use up some of my fabric stash so I can make room for new fabric.

And soooooo...the challenge begins!

Graduation Outfit

My son graduates next month from basic training.  So my mom, my other son and I will be headed to South Carolina for his graduation.  I am super excited!  But I must find the perfect outfit to wear!  You know mom has to look cute!   There are a a lot of unknowns about this trip.  Being in the south already, I know that weather most likely will be hot and balmy.  And I also know that the graduation will be out doors, weather permitting (translation as long as we don't get hit with one of those crazy summer rain storms), so I need something that is suitable for out door weather.

Last month I picked up a lot of really cute patterns from Hobby Lobby and JoAnn's when they had their sale.  So last night I started flipping through them in hopes to find the perfect dress to sew.

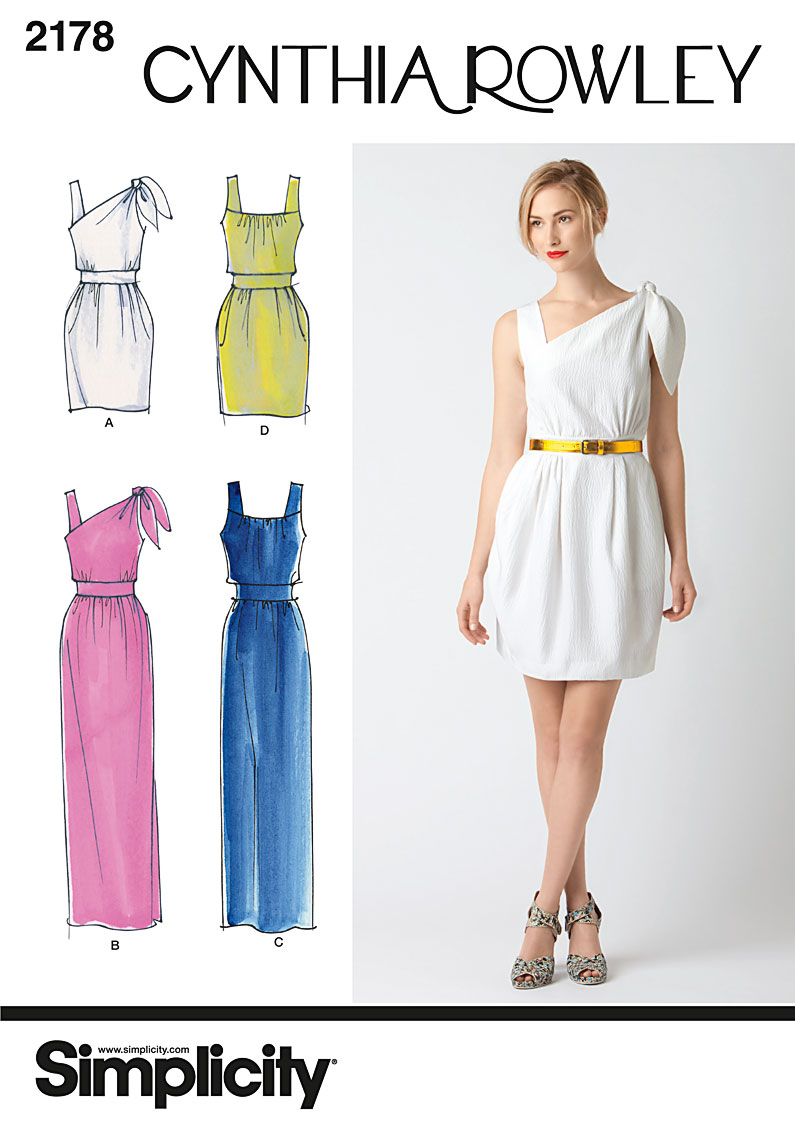
I decided to sew the Simplicity 2178 Cynthia Rowley dress - I am of doing View A minus the strap and the shoulder tie (just a seam).

Here is the Cynthia Rowley Resort 2010 version of the dress (Below). I love the color blocking with the coral and the white.


There a a few reviews of this pattern on www.patternreview.com that will be very helpful when I sew this baby together.  It seems a few people had some little issues with how the bodice, waistband and skirt attach together.  But I don't think I will let that deter me...I love this dress!


Ironing Board Table


I needed some storage in my sewing room as well as a larger ironing area.  So I decided to build an "ironing board table".  I used a combination of a workbench plan and a bookshelf plan I found at www.ana-white.com .  I found the totes at Family Dollar. The larger totes were $3.50 and the smaller ones are shoe boxes that were $1.00.  They hold my interfacing, lining, fabric scraps, zippers, buttons and misc. notions.  In person, the green is not as bright.

The ironing board is 4 1/2 ft long, whcih is about a foot longer than a regular ironing board.  I covered  it in quilted ironing board fabric I purchased from JoAnn's and stapled to the MDF board.  I then picked out a grey damask broadcloth I found at Hobby Lobby to give the table a more decorative look.  The damask fabric can be removed and laundered if necessary.


The table is also deep enough were I can place my cutting mat on it and cut out smaller projects.  Although the table is not perfect, it will do for what I need it for.  Now on to finishing getting the rest of my sewing room organized.

Sunday, March 24, 2013

Spring 2013 Colors and Trends

This years spring color palette is a mix of vibrant brights and soothing neutrals that will mix well together, but still stand out on their own and demand attention.


I must say the colors that stand out the most for me personally are the Lemon Zest, Poppy Red and Nectarine.  Red and orange have always been very good colors for me to wear, however, this year I really want to step out side the box and try to incorporate the yellow into my wardrobe choices.  I'm just not quite sure how it will work with my skin tone.

I love these looks InStyle published in their April edition.  I think I may do a skirt, dress or a pair of shoes in yellow.  And I love the idea to pair it with orange, navy or purple...I think that is the perfect color combination to help tone it down some.


What's your favorite color for Spring?


Sunday, March 17, 2013

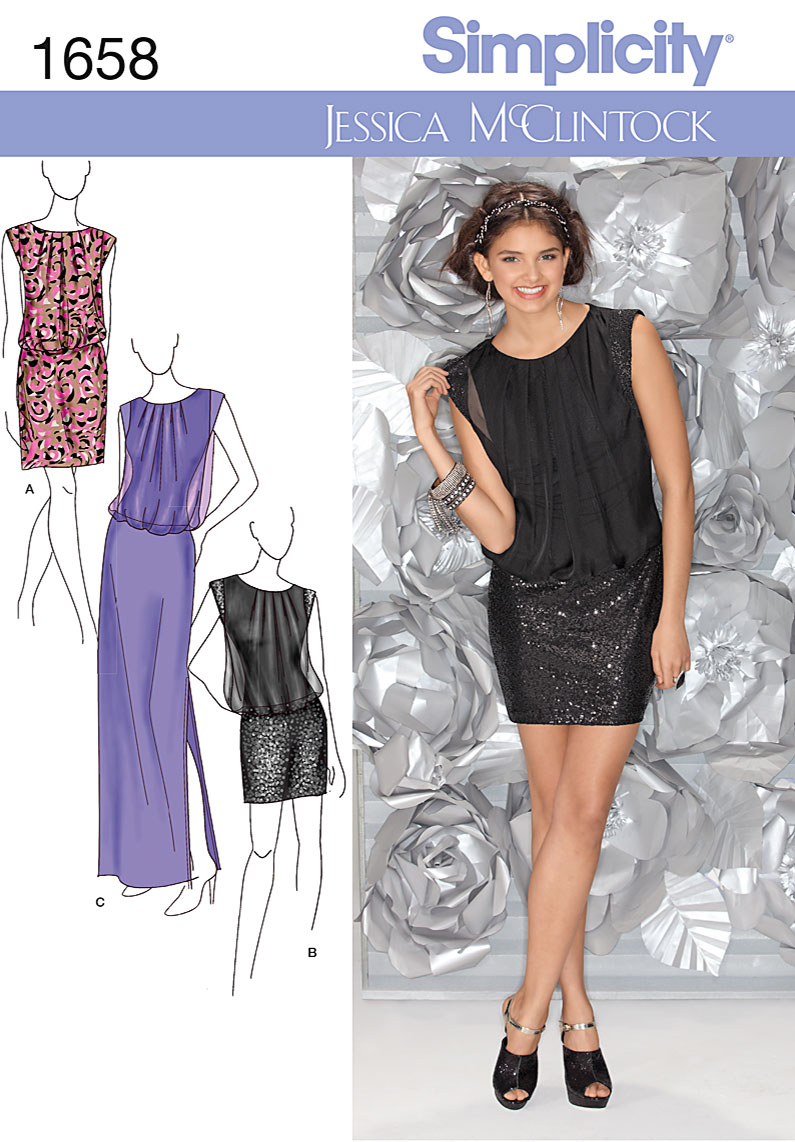
Pattern Review: Simplicity 1658 Jessica McClintock Dress.

Pattern Description:  Depending on the view you decide to sew and that fabric you use, this dress can be a nice everyday dress, date night dress or worn for a cocktail or evening event.
Pattern Sizing: 14-22
Did it look like the photo/drawing on the pattern envelope once you were done sewing with it? Yes
Were the instructions easy to follow? Yes
What did you particularly like or dislike about the pattern?  I loved the simplicity of the dress. I had just the right amount of flair! However, I did not like the flange in the sleeves.  I sewed the pattern with them initially, but went back and removed them.
Fabric Used: For the under layer and lining, I used a light weigh fabric (unknown…something I had in my stash).  For the over layer I used organza.  The skirt was made out of a medium weight stretch satin. The skirt to this dress is fitted and there are no waist darts.

Pattern alterations or any design changes you made: Looking at the pictures and the drawings, I suspected that I would not like the flange sleeves, but cut and sewed the dress according to the instructions.  Once I finished it, I realized I DID NOT LIKE the sleeves for sure! So I took them off. 
I also used French seams and a rolled hem on the organza so I could have clean edges all the way around.
Because of my height (and age). I added about 2” to the hem so the hemline would be right at my knees.
Would you sew it again? Would you recommend it to others? Yes, I would sew it again. I needed this dress to wear out last night, and it was perfect for the occasion.  I did make a few mistakes that I need to fix.  I would definitely sew it again, it’s a very cute and comfortable dress.  Next time I make it I will go for a day look. Yes, I would recommend it to others, it was fairly easy to sew, instructions were clear and it is a VERY comfortable dress to wear.  I got lots of compliments on it.

Conclusion: Loved it because I was able to accomplish two things…had a cute outfit to wear out last night, and sewed up about 5 yards of fabric out of my fabric stash!


Sunday, March 10, 2013

Location, Location, Location!!!

When I moved into my house last summer, I decided I was going to put my sewing/craft room in the extra bedroom that faced the front of the house.  That way I can see out the front window and all the happenings in the neighborhood.  Needless to say, that room was very un-inspiring.

Last week as I sat at my dining room table hemming some curtains I was making for my niece's bedroom and the thought crossed my mind..."why am I NOT in my sewing room doing this???" As I looked around, I realized what I liked about the dining room was that I could see out my patio door (lots of natural light and a nice view) and that I could see my TV in my living room.  

So I pulled everything out of both rooms and started moving things around. It's still a work in progress, but I feel "inspired" already.  Hopefully by the end of the week I can have all my fabric stash sorted and reorganized.


I took a break or too to surf the net and ran across this contest on Pattern Review. An thought it would be the perfect contest to get my sewing mojo back and use some of the patterns I have that I have not tried yet.


Pattern Stash Contest

The contest starts March 16th, and ends April 30th.

Sunday, March 3, 2013

Vintage Cars

My nephew loves cars. When he was little he loved the movie Cars, but quickly informed me "I'm a big boy now!" So for his room he wants to do a vintage car theme.
Even though my nieces room is going to be a LOT of fun for me because I get to all the pink frilly  stuff.  (I didn't have any girls). My nephews room is going to be a lot easier because I did have two boys... I know boys.
Here are our Hobby Lobby finds (can you tell...I love this place!)

Paris is always a good idea! - Audrey Hepburn

Paris is always a good idea, especially when it comes down to decorating a little girls room. My sister just moved into a bigger place and now my nephew and niece get to have their own room. And my niece being a girly girl that she is, wanted at her room to be pink and princess. After a visit Hobby Lobby she fell in love with all the Paris room decor.  And the "Parisian Princess Theme" evolved.
Here are a few of the things we found that inspired us.

Sunday, November 18, 2012

Thanksgiving Tablescape with a Twist from the Traditional

The past few weeks I have been up to my elbows in modge podge, glitter and Polystain.
It all started with the realization that my little table, although it worked for everyday dinners...would not fit all the family for the holidays.  My first thought...since I'm still on the "I can build it kick" was to build a farmhouse table.  Afterall, I did a good job on my first project (my little console table).  But I put that thought quickly out the window since Thanksgiving was less than a month away.  THen one day after work it hit me...just expand my current table.  By adding 3 feet to it would make it the perfect size!  It was not as simple as I thought, but $70 later I had just the perfect table for my holiday dinner.

This year since I will be hosting dinner on the Sunday after Thanksgiving, so I decided to do a twist on the "traditional" by adding red to the decor.  I love the way the red pops against the cream damask tablecloth.


In the mist of "construction" project I went into DIY mode.  Simple Styrofoam pumpkins were purchased at Dollar Tree, Walmart and Hobby Lobby ($1.00-$3.75) and then painted with metallic acrylic paint, modge podged and sprinkled with gold, copper, silver glitter and sequins.  Pine cones (free from Mother Nature) then brushed with modge podge and sprinkled with glitter as well.  Glass votive holders filled with corn kernels and a vanilla tea light add a little ambiance lighting.
 

I found a set of 12 mini pumpkins on clearance at Marshalls.  Brushed them with modge podge and sprinkled with gold and copper glitter.  DIY napkin rings were made from unfinished wooden napkins rings purchased at Hobby Lobby (8/$2.99).  I painted the outer rims with gold acrylic paint, then wrapped them with chocolate brown velvet ribbon and added a couple of berries tied with a copper orange satin ribbon.  Each place setting is anchored with deep red chargers ($.98 at Wal-Mart) and my mom's gold flatware.


Table set for ten.  Red adds a non-traditional twist to this very traditional setting. 
 

 Since I have about 20 people invited to dinner, I plan on setting up another table in the living room with a similar décor.
Happy Holidays!!!


Tuesday, October 30, 2012

Detox Bath Mix


I found a few recipes for this on Pinterest and decided to give it a try. My allergies have been killing me the last couple of days and I have not been able to sleep well.

So figured tonight would be the perfect night to try it out and hopefully get some much needed rest. A hot bath usually relaxes me and this should take the relaxation level up a couple of notches.

From what I have read, sweating it the body's natural way of ridding toxins and since I really don’t like to do too much to make me sweat, a HOT bath is just what I need right now.

DETOX BATH MIX RECIPE

2 cups Epsom Salt (I used lavender scented since it was what I had) - helps make you sweat, reduces inflammation, relieves muscle aches, found in most bath salts

1 cup Baking Soda - highly alkaline, helps balance an overly acidic system, neutralize any chemicals that may be in your water and softens the water.

1 cup Sea Salt - helps leach out toxins, soothes open sores or blemishes

1/3 c Ground Ginger - increases circulation, opens pores, also makes you sweat

Mix all dry ingredient and store in an air tight container. I used a 1 quart mason jar.

HOW TO USE

Draw a hot bath, as hot as you can stand it and add 2 cups Detox Mix and 1 cup of apple cider vinegar. Apple cider vinegar: helps restore the acid-alkaline balance in your body, helpful for acne, softens skin. The hotter the water, the more you will sweat! CAUTION: Don’t make it hotter than you can stand. I usually start off really warm, and then continue to warm the water by adding more hot water.

Hang the DO NOT DISTURB sign on the bathroom door, light a few scented candles, put on some soothing music and then immerse yourself in the water. Lean back onto your bath pillow or a place a rolled hand towel behind your head and relax. Try to get the as much of your body as you can down into the water. Breathe deeply and RELAX! Soak for at LEAST 20 minutes.

Once you are done soaking, drain the water and get out of the tub very slowly! Don’t get up too quickly, you may feel a little light headed, even dizzy. This is normal and will go away. Turn on the shower and quickly rinse off with cool water.

DO NOT use harsh soaps or shampoos, your pores are open and any chemicals that are found in those products will absorb into your body.

Use natural moisturizer like shea butter or coconut oil. Remember, not to use anything with perfumes, dyes or chemicals. I usually do not dry off completely, this way the oil will seal in the moisture in my skin.

Because you have done a lot of sweating, it is important to rehydrate yourself, so drink lots of water. Do this before and after you take your detox bath. It is also a good idea eat immediately before or after taking a detox bath as well.

By the time you finish your bath, you will be ready to settle down for a good night’s sleep!


Sunday, October 28, 2012

Console Table

 
I completed my first project! I wanted a console table to go behind my sofa to hold photos and nicknacs.

I saw these plans on Ana-White.com for a simple console table.  I figured this would be an easy beginner project.

Console Table
Console Table


Console Table behind Sofa
I'm pretty proud of myself and love how it turned out.  Now I'm ready to build something else.

Friday, October 5, 2012

Happy Birthday

The Complete Book of Woodworking and Kreg Jig Master Kit

My boyfriend said he has never purchased ANYTHING like this for any other woman.  BUT then again, he's never dated anyone quite like me either.  It was EXACTLY what I wanted!  And kudos to him, because I did not ask for it.  He just picked up on it from conversations we had.  Lucky for him, I could not find the Kreg Jig set at Home Depot or Walmart.  I had plans to go to Lowes the following weekend to look for it and if they did not carry it, I was going to order it online.

I know most women are like "I don't want household items (or tools) for birthday's and Christmas.  But I would much rather have something that I want and could get good use out of as opposed to something that will be used or worn once or twice and then sit in a closet or on a shelf.

And in this case, I really was not expecting much since we had just returned from our Birthday Vacation., the trip of a life time...10 days in Hawaii!

So now I have doing a lot of reading out of this book, in addition to bookmarking woordworking plans and watching YouTube videos so I can build SOMETHING!


Related Posts Plugin for WordPress, Blogger...